I am a small business owner, so any story that involves a small business that makes it big always excites me. And Emmy's Organics is no exception! Started by Samantha and Ian (out of Ian's mom Emmy's kitchen), this little business idea began with coconut macaroons and expanded to include trail mix, granola, sprouted foods and even chocolate sauce! All of their products are not only super delish, but also vegan, raw and gluten free! You just can't get better than that.
When I opened the box from Emmy's, I was first immediately impressed by their packaging. I am a packaging snob and a former advertising designer, so I always look for great logos, color combinations and overall brand feel. They had very clean and crisp labeling, with vibrant, but natural, colors and I always love the matching packaging designs, with just a little color variance. I received 4 flavors of macaroons and one small sample of chocolate sauce.
I should probably say that I had *just* come off of a modified juice fast when this box arrived and all of the flavors just popped like crazy mad on my poor, neglected taste buds! ;) But, I saved some of each and tried them again yesterday and they all still tasted amazing. So, no juice fasting required!
Ok, down to business...
Coconut Vanilla - If you like coconut, but don't like too many other crazy flavors, this one is for you! I was obsessed with the subtle vanilla flavor these had. Very coconutty, but that's sort of the point with macaroons, huh!? These are perfectly sweetened with seriously the most amazing vanilla flavor, and ingredients you can live with.
Dark Cacao -The chocolate flavor of these was intense and perfect. Again, a little coconutty, but duh. Seriously. Amazeballs. Rich, decadent, to die for, and still a healthy treat!
Lemon Ginger - I am kind of a lemon freak. Lemon is one of my favorite flavors in anything, and these were perfectly flavored. Not too sour, but you could definitely taste the lemon, with a slight hint of ginger. I really liked these.
Mint Chip - So, I'm not going to lie. These were MY FAVE. I nearly ate all three at once because they were that good. But, instead I just ate half of them. Such. Restraint! The chocolate and mint didn't seem like they'd be a good combo with the coconut, but they were perfect. Still very coconutty, so if you DO NOT LIKE COCONUT, then these are not for you, but seriously. Why ya buying coconut macaroons if you don't like coconut anyway, amiright? If you like anything chocolate/mint, then you MUST order these pronto. The mint was a combo of spearmint and peppermint, which is what made these the chicken dinner winner. Unless you're vegan, which means these were the "chicken" dinner winner. But either way, winning.
Chocolate Sauce - This was just evil. Here I am on a juice fast and there's this little pot of chocolatey, drippy goodness for me to try. How is it possible this is still healthy?? It's like magic, or something. I wish you could taste this for yourself....oh wait! You can. Hop on over to their shop and get yourself some of this! It would go perfectly on some homemade almond flour brownies, fresh fruit, or coconut ice cream. Or a spoon....not saying I did that, but it could be an option for you!
Overall, I am very pleased with this product. So, if you're looking for a sweet treat that won't send you into sugar coma or make your jeans shrink, then you definitely need to give Emmy's a try! And check out their facebook page while you're out here on the interwebz. Tell them Whole to Healthy sent you!! xoxo
Showing posts with label yum. Show all posts
Wednesday, May 22, 2013
Monday, December 3, 2012
Review: Simply Hemp Milk
If you follow me on Facebook, you already know a few things about me: a.) I love me some hemp seeds, and b.) I am infatuated with the documentary Average Joe on the Raw. So, needless to say, when these two things came together in one yummy package...I had to try it!
The owner/creator of Simply Hemp Milk is none other than Seth Hayhurst, the "Average Joe" the documentary was based on. He changed his life and his health when he began eating a Raw foods diet. I was even inspired to do the Raw foods diet study after watching the documentary.
One thing that intrigued me the most about Simply Hemp Milk, was that it came in a powdered form. That eliminates the need for any preservatives, or other unnecessary additives that most shelf-stable milk alternatives have.
When I received the samples, I was immediately impressed by the packaging. The milk powder comes in a very natural, simple package, but still very attractive and fun. It's also unbelievably easy to make! All you do is dump the contents of the package into your blender, add water, and blend. It took no time at all to have some fresh, delicious hemp milk, without the worry of unwanted sweeteners, chemicals, and other junk. Of course, that also means the milk won't last for weeks, like some pasteurized versions will, but that's ok. It won't make it that long anyway!
I tasted it plain, and really enjoyed the subtly sweet, somewhat cinnamony taste of the milk by itself, but my very favorite way to use it was in my smoothies. Hemp is an excellent source of protein, amino acids, essential fatty acids, and phytonutrients, so by adding it to my smoothies I was really getting a great boost of nutrients, while adding a super yummy dimension to my smoothies. It would make a great after-workout drink, fo sho.
So, do me a favor and head on over to Simply Hemp Milk and order a sample pack (or more)! You can thank me later. <3
Friday, November 2, 2012
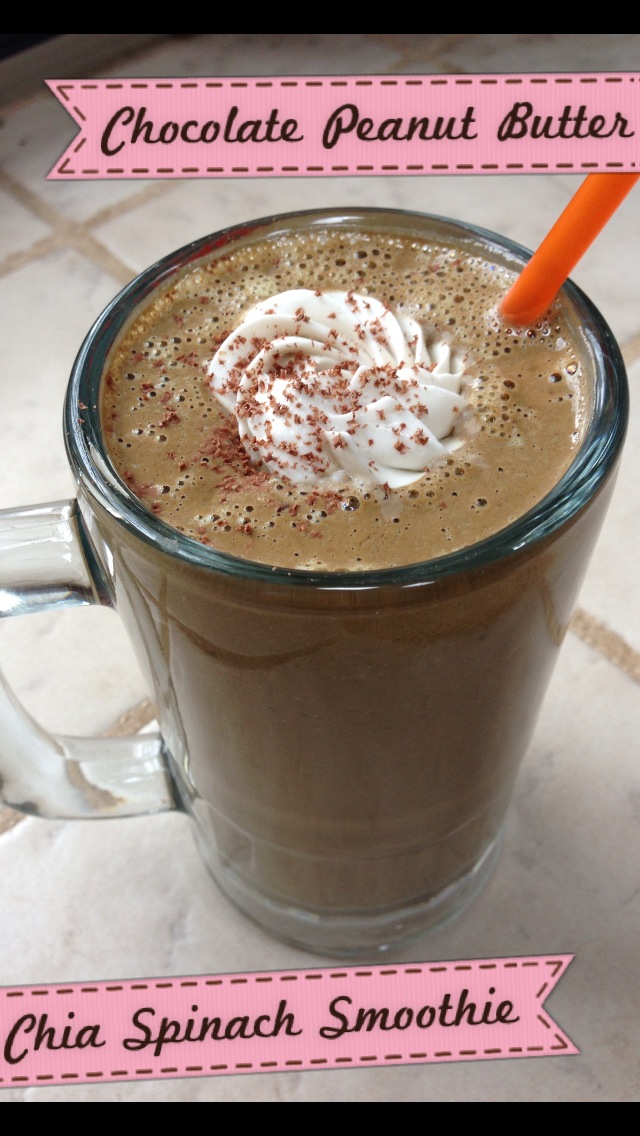
Chocolate Peanut Butter Chia Spinach Smoothie!
I was taking a study break one day last week and was really craving peanut butter and chocolate! But, since I have finally broken my weight loss plateau, I wanted to keep it as clean and healthy as possible. So, I created this ridiculously yummy and healthy smoothie! Enjoy!
Chocolate shavings, optional, but pretty!
Serves two-three
1 cup simply hemp milk (any milk would do)
3 heaping Tablespoons of all natural peanut butter
1 T chia seeds
2 T cacao powder
4-5 slices frozen banana
Two big handfuls of spinach
5-7 ice cubes (to your texture preference)
1 t. vanilla
4 medjool dates
Pinch of salt
Add all the ingredients into your Vitamix (or high powered blender), and blend until smooth and to your desired consistency. Top with a tiny dollop of whipped coconut cream and chocolate shavings. You'll think it's a fancy milkshake, but without the extra calories and sugar!
Whipped coconut cream
1 can of coconut milk, refrigerated for 4 hours or more (I keep a can in the refrigerator at all times so I can make this any time I want)
1 t. vanilla (or fresh vanilla bean is even better!)
1/2 t - 1t. sweetener of choice, to taste (I have used organic raw agave, maple syrup, and coconut sugar, you could also use cane sugar or honey, or of course powdered sugar. I would like to use dates, but haven't had the time/patience to do it just yet.)
Open your can of refrigerated coconut milk, scoop out JUST the top white part that has firmed up. You don't want any of the water that's left in the bottom. Use a mixer to whip the coconut cream until it is soft and whippy looking. Add vanilla and sweetener. Start low on the sweetener, taste your whipped cream, add more if you want a sweeter cream. And, done! You could add cinnamon, nutmeg, pumpkin pie spice, etc for a spicy kick.
Chocolate shavings, optional, but pretty!
Friday, August 17, 2012
Healthy Blender Recipes/Excalibur event plus an original recipe!
I am super excited to announce that I was selected as one of 30 Raw food blogger/chefs to be in a fun event with The Blender Girl (aka healthyblenderrecipes) using the Excalibur Dehydrator. I still have NO idea how/why they chose me, but I am not one to turn down an amazing opportunity. And it was a challenging one too! If you know me, you already know how much I adore baking, but using a dehydrator is a whole 'nother thing. I hadn't even started the Raw part of my diet study yet, so the dehydrator had yet to be touched when I said I'd come up with my own recipe for this event. It took me a few days to come up with an idea of what I wanted to accomplish, but after actually trying to put those thoughts into action, and failing miserably three times, I started to get a little nervous. I was absolutely sure I was in over my head. But, I've felt that way before and made it through just fine, so I just kept telling myself to keep moving forward.
When my first idea for pumpkin pie wraps filled with a caramel cashew cream didn't work out (first of all, there's no pumpkins around right now, and second, sweet potato is NOT a good substitute. Yarf.), I tried going in a different direction with a cauliflower pizza crust. My experiment smelled so good and filled my house with the aroma of a pizza kitchen. I was jazzed. Until I peeked on the progress of my crust. More like soggy, splotchy, crackly nastiness. Sigh. Back to the drawing board.
Once I tasted the pumpkin wrap, I quickly realized I didn't like that texture for a dessert anyway. I wanted something more cake-like, but couldn't find any recipes to give me an idea on where to even start. Since my recipe won't be shared until the end of August, I wanted a dessert that would be fitting for fall, and pumpkin desserts are my favorite for that time of year. Since I knew the actual pumpkin was not an option, I went a different direction: pumpkin seeds! They are so nutritious and tasty, it just made sense to give them a try. My first attempt at using them was a bust though. While *a few* pumpkin seeds are tasty, a whole entire cake made with them...not so much. So, I compromised and used walnuts, pecans, and pumpkin seeds along with a few dates to keep it all sticking together, and some pumpkin pie spice to give it a little seasonal kick. I knew I wanted a stacking dessert, so I cut this mixture into circles and placed them in the dehydrator. I wasn't sure what texture I would end up with, so I took some of the cakes out at 6 hours, 12 hours, and then left the final ones in until 24 hours. I ended up liking the 6 hour texture best. Go figure.
I also used the dehydrator to candy some nuts and pumpkin seeds to give the dessert more texture, and let's be honest, to make it look cute. I love plating foods and making my meals look fancy. Heck, why not!? After all, you start eating with your eyes before you actually taste your food anyway, you might as well have fun with it.
The caramel cashew cream took me a few tries because I wanted to make it a) tasty and b) not a pain in the butt to make. I think it turned out well. You gotta love cashews! From dairy free sour cream, to raw cream soups, to vegan cheesecake, to this yummy creamy goodness...cashews are the queen of the nut kingdom!
The chocolate ganache I had made plenty of times before, as it was from another recipe I came up with for some yummy chocolate tarts! But even that posed a tiny issue with all this unbelievable heat we're having. It started to melt almost as soon as we took it outside to photograph. But you won't have that problem, because you'll be eating it immediately. ;)
And finally! I love salted caramel, and this dessert just screamed SALTED CARAMEL! I could have gotten more elaborate, but since it was mostly just a drizzle, I kept it easy and simple with just some date paste, and a few other ingredients. You could totally leave this out, but you use date paste for the cashew cream, so you might as well give it a shot.
At first glance, this recipe may look overwhelming and complicated, but each step can be made well in advance and stored for when you're ready to use it. And any leftover candied nuts can be used in salads to give them a fun, sweet and spicy kick!
Recipe:
Pumpkin Cakes
½ cup pumpkin seeds, soaked 4-6 hours
Caramel Cashew Cream
1 cup cashews (soaking not necessary)
Chocolate Ganache
1 cup raw cacao powder (or other cocoa powder)
Candied Nuts
You can use any amount of nuts you like. Just place desired nuts and seeds in a bowl and put just enough sweetener (maple syrup, agave, raw honey) to make sure all the nuts are covered. I added ½ t. of pumpkin pie spice and ¼ t. salt too. Maple syrup and honey seem to work better than agave, in my experience.
Salted Caramel Sauce
When my first idea for pumpkin pie wraps filled with a caramel cashew cream didn't work out (first of all, there's no pumpkins around right now, and second, sweet potato is NOT a good substitute. Yarf.), I tried going in a different direction with a cauliflower pizza crust. My experiment smelled so good and filled my house with the aroma of a pizza kitchen. I was jazzed. Until I peeked on the progress of my crust. More like soggy, splotchy, crackly nastiness. Sigh. Back to the drawing board.
Once I tasted the pumpkin wrap, I quickly realized I didn't like that texture for a dessert anyway. I wanted something more cake-like, but couldn't find any recipes to give me an idea on where to even start. Since my recipe won't be shared until the end of August, I wanted a dessert that would be fitting for fall, and pumpkin desserts are my favorite for that time of year. Since I knew the actual pumpkin was not an option, I went a different direction: pumpkin seeds! They are so nutritious and tasty, it just made sense to give them a try. My first attempt at using them was a bust though. While *a few* pumpkin seeds are tasty, a whole entire cake made with them...not so much. So, I compromised and used walnuts, pecans, and pumpkin seeds along with a few dates to keep it all sticking together, and some pumpkin pie spice to give it a little seasonal kick. I knew I wanted a stacking dessert, so I cut this mixture into circles and placed them in the dehydrator. I wasn't sure what texture I would end up with, so I took some of the cakes out at 6 hours, 12 hours, and then left the final ones in until 24 hours. I ended up liking the 6 hour texture best. Go figure.
I also used the dehydrator to candy some nuts and pumpkin seeds to give the dessert more texture, and let's be honest, to make it look cute. I love plating foods and making my meals look fancy. Heck, why not!? After all, you start eating with your eyes before you actually taste your food anyway, you might as well have fun with it.
The caramel cashew cream took me a few tries because I wanted to make it a) tasty and b) not a pain in the butt to make. I think it turned out well. You gotta love cashews! From dairy free sour cream, to raw cream soups, to vegan cheesecake, to this yummy creamy goodness...cashews are the queen of the nut kingdom!
The chocolate ganache I had made plenty of times before, as it was from another recipe I came up with for some yummy chocolate tarts! But even that posed a tiny issue with all this unbelievable heat we're having. It started to melt almost as soon as we took it outside to photograph. But you won't have that problem, because you'll be eating it immediately. ;)
And finally! I love salted caramel, and this dessert just screamed SALTED CARAMEL! I could have gotten more elaborate, but since it was mostly just a drizzle, I kept it easy and simple with just some date paste, and a few other ingredients. You could totally leave this out, but you use date paste for the cashew cream, so you might as well give it a shot.
![]() |
| Photo credit: Melissa Hitzemann, Whirlygig Photography |
At first glance, this recipe may look overwhelming and complicated, but each step can be made well in advance and stored for when you're ready to use it. And any leftover candied nuts can be used in salads to give them a fun, sweet and spicy kick!
Recipe:
Pumpkin Cakes
½ cup pumpkin seeds, soaked 4-6 hours
½ cup walnuts
½ cup pecans
2 medjool dates
½ t. pumpkin pie
spice
¼ t. salt
Pulse above in food
processor until mixture holds together when pressed against the side of the
bowl. Dump out onto waxed paper and
flatten/roll out to about ¼” thick. At this point you could cut them into
circles with a cookie cutter, or cut into squares, or just leave it as a large
rectangle and make one big cake out of it.
Place on teflex
sheets in dehydrator at 115 for 6 hours, flipping half way through. I also
placed them on the regular dehydrator screens after 3 hours for a drier
texture. These can be dehydrated for longer, depending on what texture you
want. The longer they are in the dehydrator, the crunchier they become.
These cakes store very well. You could make them
days ahead, or even freeze them for a future event.
Caramel Cashew Cream
1 cup cashews (soaking not necessary)
¼ cup date paste
1 T maple syrup (or
agave)
2 t. maca powder
2-3 T water, until
desired consistency
Blend ingredients in
Vitamix or high speed blender until smooth, but still thick. You can always add
more spices or sweetener to this until it suits your taste buds.
This can be stored in the refrigerator for 3-4 days
before use.
Chocolate Ganache
1 cup raw cacao powder (or other cocoa powder)
1 cup maple syrup
(or agave)
½ cup coconut oil
Mix all ingredients
in food processor until blended. The
mixture will harden once it is refrigerated.
To drizzle on dessert, I put some aside in a squeeze bottle and
refrigerated the rest. You can use a spoon
just as easily if you don’t have a squeeze bottle. You may need to take your
ganache out of the refrigerator a few minutes to soften before it can be piped.
This can be stored in the refrigerator for weeks, if
it lasts that long! I can eat it with a
spoon!
Candied Nuts
You can use any amount of nuts you like. Just place desired nuts and seeds in a bowl and put just enough sweetener (maple syrup, agave, raw honey) to make sure all the nuts are covered. I added ½ t. of pumpkin pie spice and ¼ t. salt too. Maple syrup and honey seem to work better than agave, in my experience.
Dehydrate on 115 for
8-12 hours, or until they are dry and no longer sticky to the touch.
These candied nuts/seeds are great to have on hand
to use in salads with some dried cranberries! They can be stored in an airtight
container or ziplock bag for weeks.
Salted Caramel Sauce
2T date paste
1 t. maca powder
1 t. vanilla
¼ t. salt
1 t. agave
Stir together in
bowl, and use a spoon or squeeze bottle to drizzle on dessert. This really adds
a little something special to the final dessert, and it’s super quick and easy
to throw together.
This can be made a few days ahead of time and stored
in the refrigerator.
You can arrange this
dessert in any way you like, but I drizzled the unrefrigerated ganache and the
salted caramel onto a plate, placed one pumpkin cake, then piped ganache, then
candied nuts, then piped the caramel cashew cream, repeat. If you are making one large cake, you could
just spread on the ganache and cashew cream, and top with a sprinkling of nuts,
and drizzle. You really can’t go wrong
no matter how you arrange these yummy layers!
I hope you enjoy this recipe! Please let me know if you make it and what your thoughts are!
Enjoy!
I hope you enjoy this recipe! Please let me know if you make it and what your thoughts are!
Enjoy!
Monday, June 25, 2012
Blueberry Maqui Banana Smoothie
![]() |
| Blueberry Maqui Banana Smoothie |
Recently I was able to review some of the Navitas Naturals products and combined a few into this delicious smoothie. I still want to experiment with the other powders, but today I will focus on the magic of Maqui.
Maqui are the berries from the Chilean evergreen shrub and contain a high amount of antioxidants, phytochemicals, anthocyanins, trace minerals and polyphenols. In addition to containing huge health benefits, Maqui powder from Navitas Naturals is also certified organic and is a Raw food. In other words, you need to get your hands on some of this.
One of the easiest ways to enjoy these powders is to slip some into your favorite smoothies. You can't go wrong with any of their foods, so just jump in and enjoy.
Blueberry Maqui Banana Smoothie
3/4 cup frozen blueberries
1 medium frozen banana
1 T Maqui powder from Navitas Naturals
3 golden berries from Navitas Naturals (3 doesn't sound like much, but these babies are potent!)
1-2 medjool dates, pitted (add more for your sweetening pleasure)
1 to 1 1/4 cups of almond milk, depending on your preference in texture
3 ice cubes (mine are larger ice cubes, so if you have an ice maker or smaller trays you might need to add more ice)
Place all ingredients in a high speed blender (I highly recommend a Vitamix!), blend until super smooth! Slurp up! xoxo
Sunday, June 24, 2012
Almond Flour Pancakes with Fresh Peach Syrup and Whipped Coconut Cream
I did not invent this recipe, but I did tweak it a bit and I think they turned out the best I've ever had them. The original recipe can be found here. And if you're interested, Elana of Elana's Pantry has the best almond flour cookbook. It's good even if you're not Paleo.
- 3 large eggs
- 3 tablespoons almond milk, or more to thin out batter (I used homemade vanilla almond milk that was sweetened with dates, so if you're going to buy almond milk, get the sweetened vanilla.) You could also use water here, but the flavor/texture would be different.
- 1 tablespoon vanilla extract
- 2 tablespoons real maple syrup or raw honey
- 1 ½ cups blanched almond flour (you could use almond meal, but I'm not a fan of the texture.)
- ¼ teaspoon sea salt
- ¼ teaspoon baking soda
- Organic extra virgin coconut oil for the griddle
- In a large bowl whisk together eggs, almond milk, vanilla and syrup/honey
- Add almond flour, salt and baking soda and mix until thoroughly combined
- Heat coconut oil on skillet over medium low to medium heat
- Scoop about 1/4 cup of batter at a time onto the skillet
- Pancakes will form little bubbles, when bubbles open, flip pancakes over and cook other side
- Remove from heat to a plate
- Repeat process with remaining batter, add more oil to skillet as needed
Peach syrup
Now this one I did invent, sort of. It's not rocket science, but I didn't follow a recipe.
1/2 a fresh peach, sliced
2 medjool dates, pitted and pulled in half
sprinkling of cinnamon, to taste. (maybe 1/4 teaspoon)
Squirt of fresh lemon juice (not much, maybe 1/4 teaspoon)
1/4 cup of water
In a small saucepan, place all ingredients and stir until mixed through. Simmer on medium-high heat until mixture boils. Turn to medium-low and let boil, stirring occasionally (make sure to mash dates really well to release their yummy sweetness. this will also help to thicken the syrup). Once mixture is thicker, and tastes sweet enough, it's ready! Pour on top of pancakes and enjoy!
Whipped Coconut Cream
This one is so easy and tasty, I sometimes can't believe it's as healthy as it is.
1 can of coconut milk, refrigerated for 4 hours or more (I keep a can in the refrigerator at all times so I can make this any time I want)
1 t. vanilla (or fresh vanilla bean is even better!)
1/2 t - 1t. sweetener of choice, to taste (I have used organic raw agave, maple syrup, and coconut sugar, you could also use cane sugar or honey, or of course powdered sugar. I would like to use dates, but haven't had the time/patience to do it just yet.)
Open your can of refrigerated coconut milk, scoop out JUST the top white part that has firmed up. You don't want any of the water that's left in the bottom. Use a mixer to whip the coconut cream until it is soft and whippy looking. Add vanilla and sweetener. Start low on the sweetener, taste your whipped cream, add more if you want a sweeter cream. And, done! You could add cinnamon, nutmeg, pumpkin pie spice, etc for a spicy kick.
I love to garnish my food. Once you've plated your pancakes and syrup, sprinkle generously with yummy nuts or hemp seeds. Then dollop with Coconut Cream! Nom-ola!
Subscribe to:
Posts (Atom)